
I recently setup my custom CNC machine, that’s running a duet3d 2 Wifi as it’s brain – with 2 probes so that I can handle tool length compensation, work corner finding, and most importantly – dynamic z surface compensation to handle scenarios were your material is not perfectly flat but you don’t want to surface it down to dimension.
In my case the scenario is wanting to engrave text into plywood – the plywood is not perfectly flat (neither is my bed) but doing a facing operations would just create uneven passes through the plywood layers.
So enter a capability from the 3d printing word of ‘mesh probing’ a surface then dynamically adjusting your gcode to by those z offsets.
The youtube video all about it is here:

The gcode macros referenced are below
my probe init code in system is in a file called config-probe.g and looks like:
T0 P0        ; Select Probe Tool
M558 K1      ; Ensure we are using Probe K1 config
G10 L1 P0 Z0 ; Clear any prior offset
; 1. Move to HARD POINT
G28 Z        ; Home Z to top of travel (Safe!)
G53 G0 X94 Y15
; 2. Probe the Hard Spot
M291 P"Probing Hard Reference..." T3
G30 K1 S-1   ; Probe and report height
; 3. Calculate "Virtual" Setter Height
; We add the SetterOffset so the machine thinks we touched the tool setter
set global.RefProbeHeight = move.axes[2].machinePosition + global.SetterOffset
M291 P"Spindle Probe Calibrated!" S1 T3
You need to set G53 with the x,y of your own hardpoint.
Once you’re here – the workflow after putting the x,y,z probe in the machine is basically
- Calibrate the z trigger height of the probe against a know ‘hard-point’
- use the probe to find the x,y,z 0 corner of your workpeice
- probe the surface of your workpiece
- Modify the heightmap to recentre it’s data around machine 0
- switch out for the actual cutting tool
- measure the length of the cutting tool as compared to the x,y,z probe
- enable the heightmap processing
- Run the job
So run the above macro with the x,y,z probe in the machine and it should touch to the hardpoint and stop.
Then you can mangually jog until you’re just close to the top surface ‘bottom right’ of your stock (relative to machine 0)
Then run something like the below macro for finding ‘work’ z,y,z 0
; set_work_corner.g

; Finds X, Y, Z Zero on stock corner using Spindle Probe (K1)

; UI: Minimal popups to prevent blocking E-Stop

; ------------------------

; SETTINGS

; ------------------------

var ProbeRad   = 1.0     ; Radius of probe tip

var SearchDist = 25      ; Max search distance

var SafeZ      = 10      ; Lift height

var Depth      = 2       ; Edge probing depth

var BackOff    = 10      ; Clearance distance

; ------------------------

; START

; ------------------------

; This is the ONLY blocking dialog. Machine is stationary here.

M291 P"Position Probe ABOVE corner (X+5, Y+5). Ready to Move?" R"Corner Find" S3

T0 P0

; ------------------------

; 1. Z PROBE (Top Surface)

; ------------------------

G91                      ; Relative Mode

G38.2 K1 Z{-var.SearchDist} ; Probe Down (K1)

G10 L20 P1 Z0            ; Set Work Z0

G0 Z{var.SafeZ} F500     ; Lift

G90                      ; Absolute Mode

; ------------------------

; 2. X EDGE (Left Side)

; ------------------------

G91                      ; Relative Mode

G0 X{-var.BackOff}       ; Move Left

G0 Z{-(var.SafeZ + var.Depth)} ; Drop Down

G38.2 K1 X{var.SearchDist} ; Probe Right (K1)

G90                      ; Absolute Mode

G10 L20 P1 X{-var.ProbeRad} ; Set X0

G91                      ; Back to Relative

; Retract and Lift

G0 X{-var.BackOff}

G0 Z{var.SafeZ + var.Depth}

; RE-ALIGN (Safety Move)

G90                      ; Absolute Mode

G0 X{var.BackOff/2}        ; Move to X+15 (Over material)

; ------------------------

; 3. Y EDGE (Front Side)

; ------------------------

G91                      ; Relative Mode

G0 Y{-var.BackOff}       ; Move Front

G0 Z{-(var.SafeZ + var.Depth)} ; Drop Down

G38.2 K1 Y{var.SearchDist} ; Probe Back (K1)

G90                      ; Absolute Mode

G10 L20 P1 Y{-var.ProbeRad} ; Set Y0

; Retract and Lift

G91                      ; Relative Mode

G0 Y{-var.BackOff}

G0 Z{var.SafeZ + var.Depth}

; ------------------------

; FINISH

; ------------------------

G90

G0 X0 Y0 F2000
; Non-blocking success message (S1)
M291 P"Work Zero Set!" S1 T3
there are a couple of points where it will prompt with calculated values so you have a chance to sense-check before it goes off and starts probing.
Probably the important part about this is that the mesh command takes it’s coordiantes in absolute machine position – so we’re calculating here what that is against the workcoordinates we just established. so you, the user, can think in terms of stock size, and have the macro tell the machine in absolute machine coordinates.
part of this is that we give it a nice safe ‘z trigger height’ to start the probe from. if you get this wrong then the machine is going to move rapidly to that start point ignoring probe inputs, so if it’s too low you crash the probe. see above damaged probe – I did this more than once before I figured this out properly.
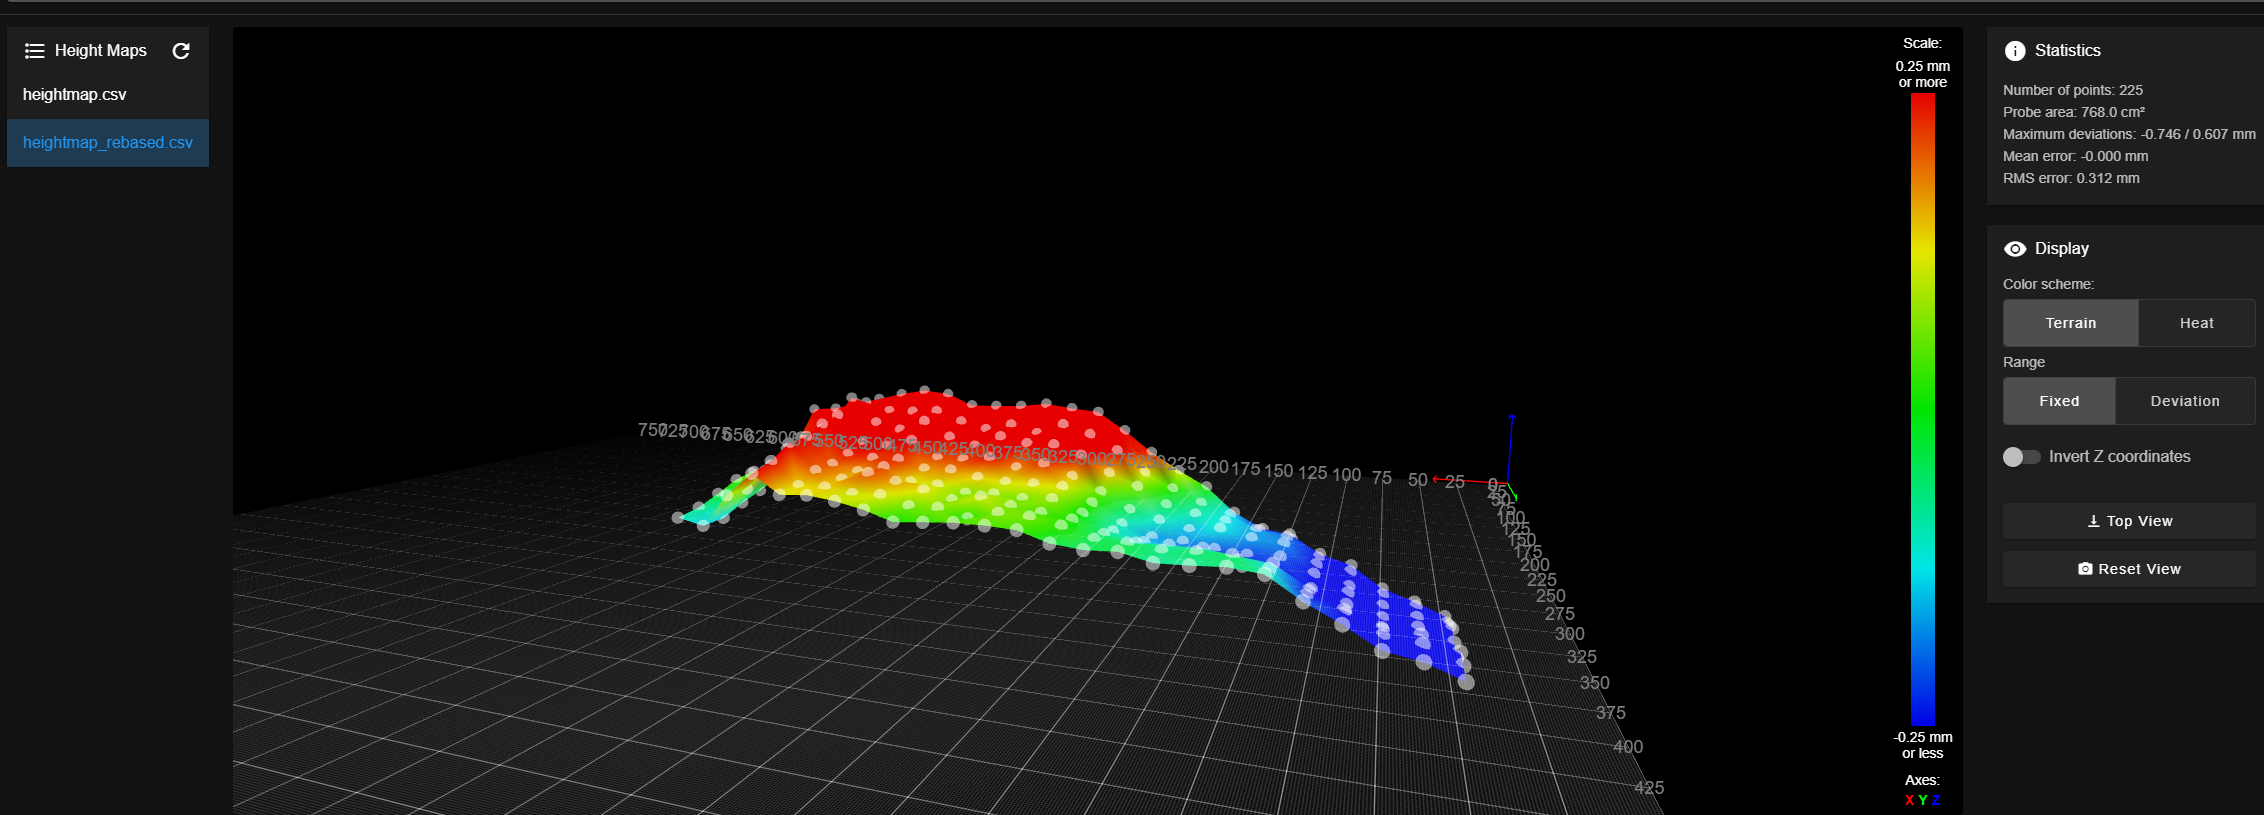
Once it’s probed it will give you a warning – complaining that what you just probed, that it thinks should be machine surface, is worryingly high above 0, because you actually probed a stock surface. This is expected – we just need to handle that shortly. The important part is the deviation – hopefully that looks fairly sane for whatever you just probed.
It will also have turned on mesh compensation with that heightmap – we want to turn that off.
G29 S2
That clears the heightmap for now. the file is saved in teh system folder under heightmap.csv so the data is safe – we just don’t want the machine to use this yet.
The problem we now have with this height data, is that since the machine thinks this related to it’s actual phsyical 0 limit – almost any move you make down now will (should) fire an alarm about being outside your machine limits. We could just disable machine limits, but lets not. Instead we’re doing to massage the heightmap data to remove the ‘stock height’ part and just keep the deviation around 0.
Conceptually the machine is going to think it is compensating for it’s uneven bed and cutting a completely perfectly thickness of material, because remember – it sort of really thinks it’s a 3d printer – and in 3d printing you are laying down perfect height filament so you never need to think of your material as the problem.
So – go to the system folder – download heightmap.csv and use the following python script to adjust it to only include the ‘error’ around 0
#!/usr/bin/env python3
"""
Rebase RepRapFirmware heightmap.csv (v2) so the grid Z values become deviations around 0.

- Detects v2 header line: "RepRapFirmware height map file v2 ..."
- Keeps the axis metadata lines unchanged
- Rebases ALL numeric cells in the Z grid (rows after the X,Y,... metadata line)
- Rewrites the v2 stats line (min/max/mean/deviation) to match rebased data

Usage:
  python rebase_rrf_heightmap_v2.py heightmap.csv heightmap_rebased.csv --mode mean
  python rebase_rrf_heightmap_v2.py heightmap.csv heightmap_rebased.csv --mode min
"""

import argparse
import csv
import math
import re
from pathlib import Path
from statistics import mean, median, pstdev

V2_STATS_RE = re.compile(
    r"^RepRapFirmware height map file v2 generated at (.*), min error (.*), max error (.*), mean (.*), deviation (.*)$"
)

def try_float(s: str):
    s = s.strip()
    if s == "" or s.lower() == "nan":
        return math.nan
    try:
        return float(s)
    except Exception:
        return None  # not numeric

def format_v2_stats(original_line: str, z_vals: list[float]) -> str:
    """
    Replace the numeric stats in the v2 stats line while preserving the timestamp part.
    """
    m = V2_STATS_RE.match(original_line.strip())
    timestamp = m.group(1) if m else None

    zmin = min(z_vals)
    zmax = max(z_vals)
    zmean = mean(z_vals)
    zdev = pstdev(z_vals) if len(z_vals) > 1 else 0.0

    if timestamp:
        return f"RepRapFirmware height map file v2 generated at {timestamp}, min error {zmin:.3f}, max error {zmax:.3f}, mean {zmean:.3f}, deviation {zdev:.3f}"

    # fallback if line format differs slightly
    return f"RepRapFirmware height map file v2 generated at UNKNOWN, min error {zmin:.3f}, max error {zmax:.3f}, mean {zmean:.3f}, deviation {zdev:.3f}"

def main():
    ap = argparse.ArgumentParser()
    ap.add_argument("input_csv", type=Path)
    ap.add_argument("output_csv", type=Path)
    ap.add_argument(
        "--mode", choices=["mean", "median", "min", "max", "first"], default="mean"
    )
    ap.add_argument("--decimals", type=int, default=4)
    args = ap.parse_args()

    with args.input_csv.open("r", newline="") as f:
        rows = list(csv.reader(f))

    if len(rows) < 5:
        raise SystemExit("File too short to be a v2 heightmap.")

    # Find the "axis0,axis1,..." line and the subsequent "X,Y,..." line
    axis_header_idx = None
    xy_meta_idx = None
    for i, row in enumerate(rows):
        if row and row[0].strip() == "axis0":
            axis_header_idx = i
            if i + 1 < len(rows) and rows[i + 1] and rows[i + 1][0].strip() == "X":
                xy_meta_idx = i + 1
            break

    if axis_header_idx is None or xy_meta_idx is None:
        raise SystemExit(
            "Could not locate v2 axis metadata (axis0/... and X,Y,... lines)."
        )

    grid_start = xy_meta_idx + 1
    if grid_start >= len(rows):
        raise SystemExit("No grid data found after X,Y,... metadata line.")

    # Collect all numeric Z values from grid rows (ALL columns)
    z_positions = []
    z_vals = []
    for r in range(grid_start, len(rows)):
        for c in range(0, len(rows[r])):
            v = try_float(rows[r][c])
            if v is None or math.isnan(v):
                continue
            z_positions.append((r, c))
            z_vals.append(v)

    if not z_vals:
        raise SystemExit("No numeric Z values found in grid.")

    # Baseline
    if args.mode == "mean":
        baseline = mean(z_vals)
    elif args.mode == "median":
        baseline = median(z_vals)
    elif args.mode == "min":
        baseline = min(z_vals)
    elif args.mode == "max":
        baseline = max(z_vals)
    elif args.mode == "first":
        baseline = z_vals[0]
    else:
        raise SystemExit("Unknown mode")

    # Rewrite grid cells
    rebased_vals = [v - baseline for v in z_vals]
    for pos, newv in zip(z_positions, rebased_vals):
        r, c = pos
        rows[r][c] = f"{newv:.{args.decimals}f}"

    # Rewrite the v2 stats line if present (usually line 1)
    # Your file has it at rows[1][0] as a single long string.
    # We'll rewrite any row where the first cell starts with that prefix.
    for i, row in enumerate(rows):
        if row and row[0].startswith("RepRapFirmware height map file v2 generated at"):
            rows[i][0] = format_v2_stats(row[0], rebased_vals)
            # If the line had been split into multiple CSV cells for some reason, drop extras
            rows[i] = [rows[i][0]]
            break

    args.output_csv.parent.mkdir(parents=True, exist_ok=True)
    with args.output_csv.open("w", newline="") as f:
        w = csv.writer(f)
        # Write rows but preserve the original v2 stats/header line exactly
        # (some heightmap producers include a long comma-containing header line
        # that we should not wrap in extra CSV quotes). If a row is the special
        # v2 header/stats line, write it raw to keep formatting identical.
        for row in rows:
            if (
                len(row) == 1
                and isinstance(row[0], str)
                and row[0].startswith("RepRapFirmware height map file v2 generated at")
            ):
                f.write(row[0] + "\n")
            else:
                w.writerow(row)

    print(f"Wrote: {args.output_csv}")
    print(f"Baseline ({args.mode}): {baseline:.6f}")
    print(f"Original grid Z range: {min(z_vals):.6f} .. {max(z_vals):.6f}")
    print(f"Rebased  grid Z range: {min(rebased_vals):.6f} .. {max(rebased_vals):.6f}")

if __name__ == "__main__":
    main()
Once you have a fixed file – you should be able to see in it that the originaly had fairly large numbers depending on the stock you probed – and now you have one with much smaller numbers slightly +/- around 0
upload this new file to the duet – if you overwrite the existing heightmap.csv that is then the default file being used – if you upload it to another file name then when you enable the heightmap you’ll need to specify the filename
Now we have out updated heightmap in hand – go back to the machine – swap your x,y,z probe for the real tool you’re going to use
Run the tool length probe macro:
; measure_tool.g
; Measures cutting tool on Tool Setter (K1) at X147 Y11
T1
; 1. Move to TOOL SETTER

G28 Z        ; Home Z to top of travel (Safe!)
G53 G0 X147 Y11

; 2. Probe with the new tool
M291 P"Probing Tool Length..." T3
G30 K0 S-1   ; Probe using Tool Setter (K0)

; 3. Calculate Tool Offset
; Diff = Current Trigger - Probe Reference
var ToolOffset = global.RefProbeHeight - move.axes[2].machinePosition

; 4. Apply Offset

G10 L1 P1 Z{var.ToolOffset}
T1

G28 Z

M291 P{"Offset Applied: " ^ var.ToolOffset ^ "mm"} S1
Again the G53 need to be where ever you mounted the tool length probe
This should then go measure your cutting tool and output an offset calculated number for a sanity check – this should basically show how much taller/shorter this new tool is compared to the tip of the x,y,z probe you just had in place.
at this point – hopefully, you can jog back to just above your workpeice and z=0 will have your new cutter just barely touching when over the bottom right corner.
Now you can run
G29 S1 P”heighmap_rebased.csv”

If that was what you called the fixed heightmap etc,/
at this point you’re good to go. when you jog in X or Y directions you should see that Z is moving slightly to compensate for the height map data.
When you run your job now – the Z heights are dynamically adjusted by this amount and if you’re engraving text you will hopefully get a nice even depth of cut across the whole stock.
Enjoy!