
Last week I wrote about building a pan and tilt webcam, and at the end of that I mentioned that the next thing was to come up with some kind of software control on the PC to allow it to be easily moved around. This is a little Google auto-awesome montage of how well things went:
Software: processing.org
I wound up checking out processing.org after watching a video from SVSeeker that showed them using the same to control their in-development underwater ROV.
I was very impressed by how easy everything was to pull together. Over the course of perhaps three hours I achieved everything I set out to do. I downloaded the processing.org environment and started to play.
First thing was to alter the interaction to the Arduino based on some examples of a state machine interaction to select options. You can just send a string of numbers divided by slashes, for instance /3/2/9/170/ is interpreted as 3rd top-level option (servo control), 2nd control within servo control, (write a value), use pin 9, set value 170. This immediately made things more flexible.
Capturing video from webcam
Second job was to get the camera feed from the webcam. This was straightforward with the video library, just get a list of connected webcams as an array. Note that within this is an enumeration of the various resolutions and frame rates supported by each camera. For me, I got about 40 options, 20 for the webcam on the laptop I was using, and 20 for the external webcam mounted to my pan/tilt. I did think about putting a picker in to allow dynamic selection, but to get going I just hard-coded the number of the one I wanted to use.
void setup(){
    String[] cameras = Capture.list();
    if (cameras.length == 0) {
        println("There are no cameras available for capture.");
        exit();
    } else {
        println("Available cameras:");
        for (int i = 0; i < cameras.length; i++) {
            println(i + ":" +cameras[i]);
        }
        // For the moment hardcoded to the one I know I want
        cam = new Capture(this, cameras[21]);
        cam.start();
    }
}

void draw() {
    boolean faceDetect=false;
    background(0);  // background black
    if (cam.available() == true) {
        cam.read();
    }
    image(cam, 0, 0);
}
Manual control
Next job was to put some controls on the screen, I found the ControlP5 library that provided a bunch of simple controls, each one you can just add specifying the name of the control, the range of values it should control, and the default you want it to start at. Along with simple x,y and width,height values for placing the control. Once added, the controls being moved triggers events to a handler method, just look up the name of the control in the event name and act accordingly.
tilt = controlP5.addSlider("Tilt",tiltMin,tiltMax,60,10,10,10,400);
pan= controlP5.addSlider("Pan",panMin,panMax,90,50,10,400,10);
In a jiffy I had two sliders, one for the tilt control up the left side of the screen and one for the pan across the top. A little wiring up and now I can click around the controls on the screen and move my pan and tilt. Hurrah!
void controlEvent(ControlEvent theEvent) {
    if(theEvent.isController()) {
        if(theEvent.controller().name()=="Tilt") {
            tiltValue=round(theEvent.controller().value());
            myPort.write("/3/2/9/"+tiltValue+"/");
        }
        if(theEvent.controller().name()=="Pan") {
            panValue = round(theEvent.controller().value());
            myPort.write("/3/2/10/"+panValue+"/");
        }
    }
}
At this point I had basically done what I really thought I was going to do and it had taken very little time. So I started to get creative with other features I could add.
Auto Pan
My first thought was that it would be cool to have an auto-pan mode where it will just sweep back and forth based on some value to set how quickly it should do so. I decided to set it as another slider which sets how many seconds between individual increments of turn, so the fastest it will turn is one increment every 1 second, and the slowest would be really slow, 1 increment every 5 minutes. To control this I added a toggle button, and another slider to set the value. I considered here using an input box to allow any number to be set, but I quite like the interaction being entirely mouse driven with no keyboard input. plus no need to validate inputs etc.
if (autopan){
    //check when last move made
    if (millis() > lastMove+(moveDelay*1000)){
        lastMove=millis();
        println("Auto-move step");
        if(autoMoveLeft){
            panValue=panValue-1;
            if (panValue160){
                panValue=160;
                autoMoveLeft=true;
            }
        }
    //this line triggers the event handler which in turn writes to the arduino
    pan.setValue(panValue);
    }
}
To make this work I just keep track of when I last moved, and every time through the draw loop check the amount of time passed since that last movement, once I go over the set value I move again and set that as the last movement point. There is a little extra complexity which is which direction you’re travelling. I decided to keep it simple, always start out panning left, then when you get to the max value, flip a direction boolean and start heading right, until you hit the min value, flip again and repeat forever.
This worked nicely and immediately led to the obvious next option… take time lapse images. This is another set of controls very similar to the auto-pan. I want a value to set how often to take a picture, and a toggle to switch that mode on and off.
Timelapse
From an implementation point of view it turns out to be very simple to get a frame of the video as an image. There is even a mode that will auto-increment filenames for you, however I found it was using some internal frame counter such that whilst the filenames did increment in order, they were not sequential numbers. This caused problems for the app I downloaded to stitch images together into a little video so I decided to just keep track of my own frame counter. Plus a little logic to handle creating different folders every time you switch the mode on so they don’t overwrite each other.
if (timelapse){
    if (millis() > lastCapture+captureDelay*1000){
        lastCapture=millis();
        //
        //take picture to be stitched later
        //
        saveFrame("C:\\Users\\d.would\\Videos\\timelapses\\timelapse"+timelapseCount+"\\timelapse-"+frame+".png");
        frame++;
    }
}
Again so simple that I realised I still had plenty of time to carry on and this is when I got ambitious…face tracking.
Face detection
I’ve seen this kind of thing on youtube so it is hardly novel, however it is pretty freakin’ cool so I guess it was inevitable to try it. Going in I had no idea how hard it might be handling face tracking, and O.M.G. this stuff is so easy now as to be ridiculous.
Library – opencv. this library existed and was easily available to download from within the processing.org interface. Import the library, create the object and tell it you want the face identification mode (it seems like it has a few options for doing thinigs like filtering out moving objects from an otherwise stationary scene) Then just pass it frames from your video feed. In return it passes back an array of detected face objects. Its empty if it can’t find any. For each face in the array you basically get given the bounding box within which the face exists. So x,y of the top left corner and width,height. By iterating through the array looking for the ‘widest’ face you get a proxy for the closest face.
if (cam.available() == true) {
    cam.read();
    opencv.loadImage(cam);
}
Rectangle[] faces = opencv.detect();
int closestFace=0;
int widestFace=0;
faceRectX=0;
faceRectY=0;
faceRectW=0;
faceRectH=0;//use width as proxy for closeness, pick the one which is widest and follow it.
for (int i = 0; iwidestFace){
        closestFace=i;
        widestFace=faces[i].width;
    }
}

if(faces.length >=closestFace+1){
    faceRectX=faces[closestFace].x;
    faceRectY=faces[closestFace].y;
    faceRectW=faces[closestFace].width;
    faceRectH=faces[closestFace].height;
}
//draw frame from webcam
image(cam, 0, 0);
//draw rectangle at co-ordinates for face
noFill();
stroke(0, 255, 0);
strokeWeight(3);
rect(faceRectX, faceRectY, faceRectW, faceRectH);
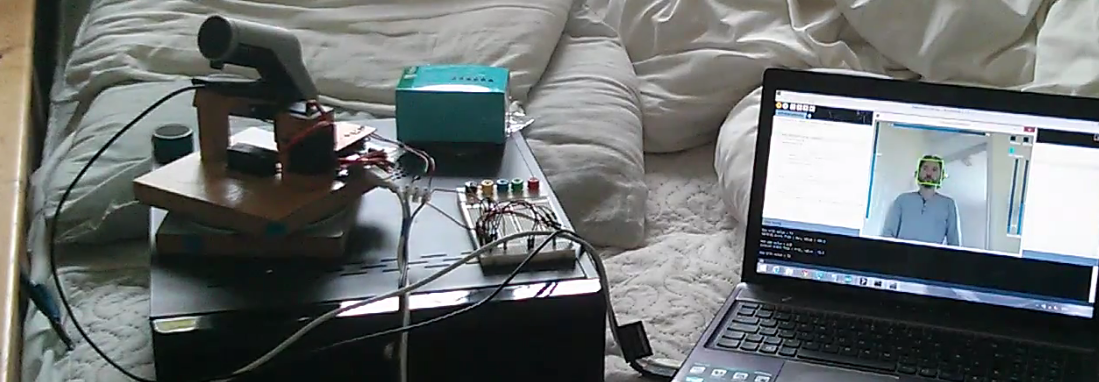
So that was impossibly straight forwards, by using those values to draw a rectangle you can visually see on the screen where it has recognised faces. That alone is crazily cool, when you think about what must be involved in detecting faces from an image.
Face Tracking
But once I have this information turning it into tracking controls is pretty easy. Basically I want to put the face in roughly the middle of the the screen. So I figure out the middle of the bounding box of the ‘closest’ face, then determine how far off centre on the x and y planes that is. Anything outside of about 20 pixels of centre and I send a command to the arduino to pan or tilt in the appropriate direction to shift the face closer to centre.
if (faceTracking){
    int xpos = faces[closestFace].x + (faces[closestFace].width/2);
    int ypos = faces[closestFace].y + (faces[closestFace].height/2);
    if (xpos<(width/2) -10){
        //move camera slightly left
        if (panValue(width/2)+10){
        if (panValue>panMin){
            panValue--;
        }
    }
    if (ypos<(height/2) -20){
        if (tiltValue(height/2) +20){
        if (tiltValue>tiltMin){
            tiltValue--;
        }
    }
    pan.setValue(panValue);
    tilt.setValue(tiltValue);
}
There is something pretty compelling about building a device that reacts to you in the environment, moving to follow you. This is already very cool, but what I found was that it is fairly slow to keep up, and easy to move a little too fast for it. To remedy this I needed to scale the movement reaction based on how far off centre the face is. the farther from centre, the larger the movement it sends to the arduino. Close to centre yields single steps of corrective movement. right near the edge of video and it moves the camera in larger steps. This meant that the camera could do a better job of keeping up, though it is still fairly easy to outpace it.
Optimising performance
So this is all working great, however I realised that face detection was slowing things down a lot, I knocked up a quick FPS counter and sure enough doing detection on every frame drops the frame rate to about 4 frames per second. Which is pretty terrible considering the camera is producing 30fps. So I played around with doing face detection on different fractions of the frame rate, it turns out that actually just doing it on alternate frames is enough to make a big difference, I got right back up to 20-25fps, and the face detection handling 10-14 updates per second, which is a lot better than the 4 I was getting trying to do it every frame.
Summary
This was crazily easy. from never having used processing.org or its libraries before, to a full interactive UI with manual controls and auto-pan, timelapse and face tracking modes in about 3 hours.
Now to set it up to take some interesting long duration panning time-lapses. I’ll have to think of suitable places to set it up, possibly in the workshop whilst I’m making other things.
Dan
Your cart (items: 0)
Your cart is currently empty!
Notifications
5 responses to “Pan and tilt webcam – Face tracking”
Thank you so much for detailed description of the project, I’m trying to follow and get my pan and tilt system working but when I upload the Arduino sketch, I get an error highlighting line: println(“There are no cameras available for capture.”);
saying: variable or field ‘controlEvent’ declared void
Any ideas how I can troubleshoot the error?
Thank you
I’d start by commenting out that line. It’s possible I made a cut and paste error when I copied the code into the blog post. If you comment out that line and it gives the same error about the next one then the problem is likely the line before it.
Could you possibly upload complete source file for download, I seem to get multiple errors in different parts of the code once I comment it out. Thank you
I’ll see what I can do. Having recently moved house things are still in a bit of disarray.
Thank you! Whenever you get a chance. I’m currently working on an interactive art piece that uses face tracking , pan and tilt system as well as video capturing, but haven’t been able to get it to work completely. I’m hoping your code can help me to finish the piece.